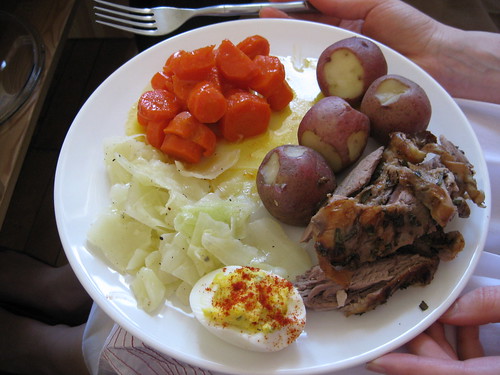
There are a few requirements for Easter dinner, at least chez Zo. Number one: roast lamb. Number two: new potatoes. To make up the rest of the dinner, we decided to use sides that go well with any roast dinner: steamed cabbage and glazed carrots. Finally, somebody has a weird attachment to deviled eggs, which will be their own post, so she made some for her own dinner.
We got up epic-ly early on Easter Saturday in order to head for the market and buy what we would be needing for Monday's dinner. Unfortunately, in our vernal zeal, we got there so early that all the meat-selling stalls were not yet open. We strolled around, bought our herbs and vegetables and, there being still plenty of time before the meat-stalls opened, sat down to an oh-so-European breakfast of chocolat chaud and croissants à l'érable. Eventually, we headed over to the stalls, only to find that the lamb was priced at approximately
$10, 982, 398, 798, 234 /lb. Or something equally out of our price range. So we walked back home and nabbed the last leg of lamb in the grocery store.
Well, having never cooked a roast of meat on our own before, we were understandably apprehensive. We diligently scoured the internet (ok, we searched "lamb" on the BBC food site) and came up with this recipe, complete with video instructions. The recipe for the lamb itself was great, and we stuck with it pretty much 100%, except, because our leg was slightly larger than 2 kilos (it was the only one left in the store, ok?), so we cooked it a bit longer. We were also without a meat thermometer, so we had to go by the handy guide printed onto Eliz's oven, and by how delicious the meat looked. And boy, did it look delicious.
We opted against the gravy included in that recipe, and instead went with a more traditional mint sauce. The recipe we used calls for waaaaaaaaaaaaaaaaay too much mint, so we ended up with waaaaaaaaaaaaaaaaay too much sauce. But oh well, c'est la vie. Here is a relatively good recipe, but remember that, especially with this kind of thing, measures are approximate and you should just do what tastes good.
Mint Sauce for Roast Lamb
A bunch (≈ 5-10g?) of fresh mint
1 tbsp (+) hot (recently boiled) water
1 tsp (+) sugar
2 tbsp (+) vinegar (white wine or cider would work best, but red wine or sherry would also work. Do NOT use white or malt vinegar. You will regret it.)
- Chop the mint very finely, or use a food processor. If using a food-processor, do not whizz it so fine that it becomes a paste. You want small, reasonably regular, pieces a few millimeters across. It's also ok if they're a bit bigger (like if you're chopping).
- Put the mint into a small bowl, or whatever vessel you're using to serve the sauce. Pour enough freshly boiled water over it to cover, plus a little bit more.
- Leave it to steep for 15-20 minutes. You're basically making a mint tea here, which you will flavour, thereby turning it into a sauce. It's like magic!
- Add sugar and vinegar. Stir to dissolve the sugar.
- Taste it to make sure it's well balanced. It should be sweet, tart, minty and super-duper yummy. Add more vinegar or sugar (or both) to taste.
Glazed Carrots
500g carrots, chopped
500 ml water
25g sugar
1 tsp salt
50g butter
Serving
- Put all ingredients in an appropriately sized saucepan.
- Bring to a boil, then turn down to a simmer
- Simmer for a long time, until almost all of the liquid has gone. It should be a glaze (hence, "glazed carrots"). If you think it's done, leave it a little longer for added deliciousness. The glaze may even begin to caramelize (turn brown and become caramel), which is fine. And scrumptious.
New PotatoesAs many new potatoes (the little ones with the fine skins) as you can eat.A few more new potatoes, because they are just so moreish, and you can fry them up the next morning for excellent home fries.Some butter, to serve.
- Wash the potatoes in cold water and cut out any gross pieces or eyes.
- Put the potatoes in a saucepan and cover with cold water.
- Bring them to the boil and keep them there until a fork goes in them easily (they feel as they would if they were on your plate), about 20 minutes.
- Serve with butter. Yum.
CabbageA bit less than half a cabbage (either the curly green kind or the smooth green kind works best, but the red kind is also good), chopped into piece approximately 1 inch by 1 inchButterSaltPepperA tiny bit of lemon juice (optional)
- Steam the cabbage (covered) until it is soft, about 20 minutes
- A side note on steaming: boiling will also work, but it makes the cabbage mushy, a little bit smelly, and takes all the nutrients out of it. We didn't have a steamer (a kind of double-boiler, with the inner pot being full of holes, like a colander), so we had to improvise. We took a medium-sized aluminum pie plate (the disposable kind) and trimmed it so that it fit inside our pot. We poked a bunch of holes in the aluminum with a fork and put it in the pot upside down, so that it formed a kind of raised platform on which the cabbage could sit. We put about an inch or an inch and a half of water in the bottom of the saucepan and put the cabbage in on top. Cover it with a lid and presto-change-o, you've made yourself a steamer!
- Keep an eye on the cabbage, and maybe replenish the water in the bottom with freshly boiled water once or twice during the cooking, to make sure it doesn't boil dry. You also might want to stir the cabbage once or twice (try and flip the stuff on the bottom to the top) to make sure it cooks evenly.
- Once the cabbage is fully cooked (it will be soft and edible-feeling), drain the water out and put the cabbage into a bowl. Add some butter (as much or as little as you feel is appropriate... although the more you add, the more delicious it will obviously be), plenty of pepper and a bit of salt, as well as a squeeze of lemon juice if you want, and mash it all up really well with a fork.
This is an extra-special meal, so we think a little extra effort is warranted.
- Warm up the plates in the oven (but not too hot!) before you serve, to make sure the food stays warm until you can eat it.
- Use the nicest plates, cutlery and glasses you have
- Open a really nice bottle of wine. You deserve it after all this work!
- Arrange the table nicely and light some candles (hey, we're students, ok? Not all of us have space or money for candlesticks, or serving dishes... or chairs)
- Dress up in nice Easter-y clothes!
- Listen to some Easter-appropriate music
- Enjoy with friends or family who are just as excited about this meal as you are!

No comments:
Post a Comment