Monday, November 22, 2010

Gra-Zo-la

That's granola, Zoe-style.

So as all reasonable people know, raisins are absolutely revolting. However, it appears that no reasonable people make granola on a commercial scale, because every single kind of granola available in my two local grocery stores and indeed every commercially available box of granola I have ever seen is infested with these withered monstrosities. So, short of picking through every box of muesli/granola before consumption to get all the raisins out (which I have done many times before), what is a granola-craving girl to do?

Well considering that it's term paper time, and I am willing to go to any lengths to avoid reading for or writing said term papers (except going to the laundromat), I of course decided to make some reasonable-people granola. Some graZola.

Rule number one of graZola is, of course, no raisins. If you came here looking for some kind of disgusting sultana-fest, you are going to be disappointed. There are plenty of other sites for people like you, but this recipe is reserved for those of us who like our grapes un-shriveled. So other than rule number one, graZola is pretty much a free-for-all. Use whatever you like. Don't use whatever you don't like. Don't bake it in the oven and make muesli (Zuesli?) instead. It's completely up to you. Below is the recipe that I made today, but I am definitely going to mix it up in the future. As long as all forms of dried grapes stay well away.


Recipe: GraZola
2 cups rolled/quick/minute oats (Don't listen to people who tell you that quick oats are no good, they don't have half a bag of quick oats sitting on their kitchen table, staring them down every morning.)
2 cups mixed grain flakes (I bought a bag of such flakes in the organic aisle of my grocery store. You could use all oats or your own variety of grain flakes, as long as you make it up to about 4 cups total.)
1/2 cup seeds (flax, sunflower, sesame, etc. Optional)
3/4 cup shredded coconut
1/2 cup chopped/sliced nuts (I used sliced almonds.)
1/4 tsp salt (The recipe I used said 1 tsp but it ended up way too salty.)
1/2 cup honey/maple syrup/brown sugar syrup/golden syrup (I used mostly creamed honey with a bit of golden syrup)
2-3 tbsp boiling water
1/4 cup canola oil (or other mildly flavoured oil. Actually a few tablespoons of nut oil would work really well here)
1 tsp vanilla/other extract (I just used vanilla)
~1 cup dried fruit (NOT raisins. I used about 3/4 cup banana chips, broken up, and 1/2 cup chopped dried pineapple. I wanted to have some dried kiwi and dried papaya, but the budget would not allow it.)
  • Preheat oven to 300F
  • Mix the dry ingredients (not counting the dried fruit) together in a large mixing bowl.
  • In a separate, small bowl, mix your preferred syrup with some boiling water until it dissolves (especially important with creamed honey). Once dissolved, add oil and vanilla extract.
  • Pour the dressing onto the dry ingredients and mix it all up until it's all slightly darker and shiny. Don't leave any dry patches.
  • Spread onto baking tray and bake for about 30-40 minutes, stirring every 10 minutes. It's done when it's all golden (don't let it burn).
  • Let it cool on the baking tray.
  • Put it into your storage container and add dried fruit. Shake it all about.
  • Store upside down (so you don't use up all the good bits first and end up with just oat dust at the bottom of the container) and in the fridge to keep the oils and nuts from going rancid. This is especially important if you're keeping it around for more than about 10-14 days. You can also freeze it if you make way too much.
If you'd rather have it muesli style, don't do the dressing/baking thing (and you can probably leave out the salt) and just have it uncooked, with milk or yogurt. Also delicious. Elizabeth is super against having chocolate in it and although I haven't tried it (yet) I don't think it would be too disgusting. Especially as a trail-mix-style snack, I really don't think a few chocolate chips or smarties would go amiss. But I guess we'll have to agree to disagree on that one.

Sunday, March 28, 2010

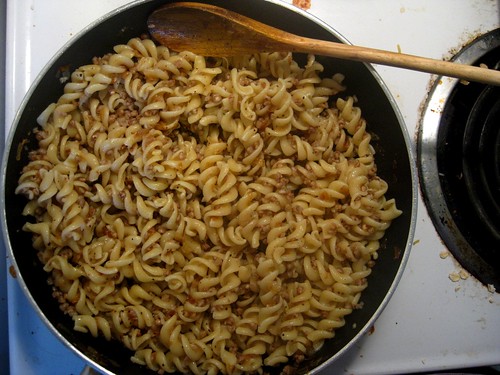
Kasha Varnishkes

I've been obsessing over different types of porridge lately, namely oatmeal, rye porridge and kasha (buckwheat). I might give an update on that later, but for now I'll just say I had a lot of extra buckwheat hanging around. So I was really excited when I came across this column on the New York Times food blog. Kasha varnishkes: Eastern European Jewish soul food. Simple to put together, and composed entirely of things I already had in my apartment.

kasha varnishkes

My recipe is not traditional, but it's still delicious.
Recipe: Kasha varnishkes
1 cup chopped onion*
1/8 to 1/4 cup olive oil**
1/3 cup buckwheat groats ("kasha")
250g (1/2 pound) pasta***
salt and ground black pepper
  • Dry-fry the onions in a pan or skillet for about 10 minutes or until they are sticking to the pan. Add the oil and fry an additional 10 minutes to make the onions a nice deep brown color.
  • Boil 2/3 cups water and add the buckwheat. Cook it the same way you would cook rice--let it boil for a minute and then reduce the heat, cover, and let the buckwheat cook by steam. It should be fluffy and tender in about 15 minutes.
  • Cook the pasta to al-dente by traditional means.
  • Drain the pasta and combine with onions, buckwheat, salt and lots of ground black pepper. Eat immediately! Mark Bittman seemed to think this would serve two, but he's out of his mind. I'm going to say more like four.
* This was about 1/2 an onion. The next time I make this I intend to use A LOT more, like double what I used today (i.e. 2 cups).
** I was supposed to use rendered chicken fat here but olive oil was just fine. Maybe I just don't know what I'm missing.
*** Bow-tie pasta is traditionally used but my pantry only gave me fusilli.

Monday, March 15, 2010

Tahri (rice with potato and peas)

Maybe I've already mentioned this, but I have the best co-workers. They are friendly, entertaining and often bring food in to share with the office. I'm very enthusiastic about this last part, so sometimes they share the recipes as well.

One woman often makes this rice with potatoes and peas. I had expressed a lot of interest in getting the recipe and learning how to cook other types of Indian food. So one day she brought me a gift: a whole bag of Indian spices, basmati rice (the type in the woven bag) and this recipe. She told me she wanted me to be fully prepared. "Now you can make any type of Indian food you want!"

I've made this twice already but forgotten to take a photo both times. I'm just going to post it anyway and maybe the next time I make it I'll update.

Anyway, this recipe goes directly out to Zoe, since it's essentially a combination of her peas recipes. My co-worker also told me she sometimes just cooks the peas and spices without the rice or potatoes (soulmate?)
Recipe: tahari (rice with potato and peas)
2 cups basmati rice
2 tbsp oil
3/4 cup green peas (frozen or fresh)
2 potatoes, chopped into small cubes
1/2 tsp fenugreek seeds
1/2 tsp turmeric
1 tsp ginger powder (or freshly grated ginger)
1 tsp garlic powder (or freshly grated garlic)
2 tsp coriander powder
salt and chili powder to taste (I use 1/2 to 1 tsp chili)
  • Wash the rice and let it soak for 30 minutes. Mix the turmeric, ginger, garlic, coriander, salt and chili in a bowl with a small amount of water. It should have the consistency of a thin paste.
  • Heat the oil and cook the fenugreek seeds until golden brown. Add the spice-water mixture and cook until all the water is gone and the oil is separated from the spices.
  • Add the peas and a little bit of water. Cover and let simmer until the peas are "half-tender".
  • Add the potatoes and more water if necessary. Cover and let them cook until the potatoes are also half-tender.
  • There should not be much water left in the pan. Add 3 cups of water (but if you have extra water in the pan, add a bit less than 3 cups) and the rice.
  • Cook on high heat for a few minutes and then cover and let simmer until all the water is gone and the rice is tender and delicious.


This rice is wonderful by itself or alongside daal or some other soupy main dish.

Tuesday, February 9, 2010

Student living

So. A package from Amazon arrived for me on Thursday, but I wasn't here to collect it and it was too big to fit through my letter box. I knew exactly what it contained (having ordered it my very own self), and was too excited to wait till after the weekend to get it, so I got up extra-early on Friday morning to head to the package depot in deepest Green Lanes to pick it up. I waited patiently (and very Britishly) in the queue, picked up the package and headed for the bus on my way to school. Once seated, I eagerly ripped open the corrugated cardboard packaging and beheld the contents: Schaum's Outline of Probability and Statistics (not what had me excited) and two new cookbooks: The Pauper's Cookbook and, the pièce de résistance, Cooking in a Bedsitter, by Katharine Whitehorn. This was a book written in about 1958 for newly independent young people, out on their own in the world and living in tiny, one-room, sink-less apartments called bedsitters, which are more or less like studio apartments (aka bachelor's apartments, aka 1 1/2s), only they didn't have ovens (coughcough), only had shared sinks and bathrooms between the other people on the floor, and had one gas ring, or two if you were very lucky. Also, these young people survived without fridges!!!

I've been searching for a copy of this book for a long time, being a newly independent young person myself, but unsuccessfully. It has recently come back into print, and then amazon.co.uk lowered the price to around £5, so I felt the time was right. Many of the recipes are pretty dated (it was written 50 years ago!), and they basically all contain meat, but there is some good inspiration in there. In particular, that it is possible to survive (and eat meat!) without a fridge. I may attempt to put this concept into practice next year if I end up living on my own, but I'll let you know about that if and when it happens. In the meantime, Elizabeth and I are going to be briefly reunited here in London in a couple of weeks, and I hope to test out one or two of these recipes when she's here (although maybe we'll leave the tripe for another visit...).

Anyways, in homage to poor students everywhere and with a nod to life's simple pleasures, I present to you a recipe to which I have recently been introduced by a Swedish friend of mine. It has already brightened a couple of days, and I'm sure it will be the light at the end of the tunnel for the next little while, or until my bread runs out. So here it is:
Cheesecake Toast (for one):
Bread (filled with lovely seeds, flax and whole grains if possible)
Cream cheese (I'm a very recent convert, and only in this recipe!)
Lemon curd (if you can't find it in your grocery store [it should be in with jams or pie fillings], it's pretty easy to make)

Cost of loaf of bread: about £1, although you can get ones that are about to go off for as little as 30p!
Cost of tub of Tesco brand cream cheese: 80p
Cost of Tesco brand, el cheapo lemon curd: 58p
  • Toast one or two slices of bread, in the toaster or the oven, to your desired toastedness
  • When toasted, spread with cream cheese, slightly thicker than you think you should
  • On top of this, spread a very thin layer of lemon curd. The Swede in question likens the lemon curd to the middle note of a major chord: just enough to give it some colour, but not enough to overpower the tonic and dominant.
  • Enjoy. Go on, have another one. So delicious and yet so cheap!

Saturday, January 30, 2010

Corn bread and some failures

So I had this idea (like a lot of other people) to bake through the Bread Baker's Apprentice. I got a copy for Christmas (along with some other excellent cook books). It's probably clear I'm really, really into bread, so of course I am taking this challenge very seriously.

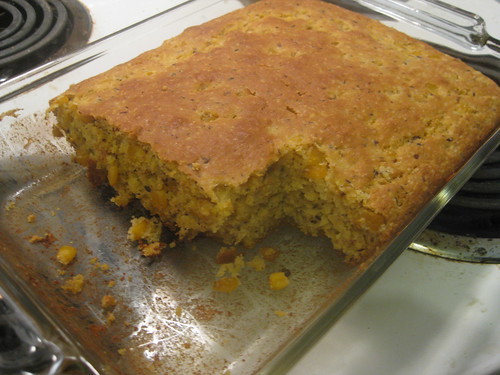
cornbread

In general I bake a loaf of bread each weekend. Last weekend I began my challenge with Anadama bread, which is a (deceivingly) simple sandwich loaf defined by its inclusion of cornmeal and molasses. Unfortunately mine was a bit of a flop. There were a few issues, ultimately causing it to be too tough and a little bland.

One: Peter Reinhart urges me to use instant yeast rather than active dry yeast. I really dig active dry yeast, but I thought I'd give instant a chance. Instant yeast comes in smaller granules and can be mixed directly into the dry ingredients. You use less of it than you would active dry, and it takes a bit longer to fully activate. The longer activation time, combined with the low temperature of my apartment caused the dough to rise extremely slowly. So slowly (four hours) that I figured it had finished rising. It hadn't!

Two: I paused my cooking to go ice skating and refrigerated the dough after the first rise. When I removed my dough from the fridge, it had formed this dry, crusty shell on the outside. I sprayed it with water and cut a slit in the top, but it was still pretty stiff. This might have prevented the loaf from fully expanding.

SO. This weekend (yesterday), I set out to learn from my mistakes and master Artos bread (Greek celebration bread). The recipe required that I make a starter dough with flour, yeast and water. I was supposed to let it sit for 3-4 hours until foamy and bubbly, then refrigerate overnight. Four hours passed and the mixture looked about the same, so I left it a bit longer. Eventually I forgot about it and went to sleep. This morning I discovered it on my kitchen countertop, gooey and deflated. It had the consistency of glue. Too heartbroken to start again, I decided to skip ahead to the only quick bread in BBA: corn bread.

Here is the recipe on another blog.

This corn bread gains my approval for its inclusion of corn kernels and honey. In the original recipe, Reinhart loads the bread with crispy bacon strips and greases the pan with bacon fat. This sounded a little revolting to me and so I left the bacon out. I also swapped the buttermilk for soy milk and the eggs for ground flax sees and water. I forgot to change the soymilk into butter-soy-milk, so I just added a little lemon juice to the dough in the end. I don't know if it actually had an effect. Reinhart also suggests that I mix the polenta and buttermilk first and leave them overnight to develop the flavors. I wanted some instant gratification after ruining my Artos starter dough, so I skipped this step and made everything together in a few hours.

It turned out GREAT, by the way. Very moist, hearty, a little sweet, and crispy on top. It's not an everyday corn bread, the type I would drizzle honey onto or dip into a bowl of chili. This is more a standalone cornbread, similar to my mom's corn casserole. I see it suited very well for holiday-style potlucks or alongside some veggies for lunch.

Tuesday, January 19, 2010

More Peas Please

So peas have recently become a staple of my diet. Frozen petit pois, at £1.50 a bag, to be exact. Now I have spent most of my life a pea-hater. The only peas I would eat (other than snow and snap, which don't really count) were fresh off the vine (?) and outta the pod, straight into my mouth. From my very own garden, of course. But then I discovered frozen peas. Now, to be precise, they HAVE to be just peas, none of this mixed vegetable shit. Just pure, unadulterated peas.

So maybe I'm making up for lost time or something (see cheesecake, milk) but I basically have them in everything. Heck, sometimes I even have just a bowlful of peas for dinner. DEEEEEE-LISH. Recently (quelle dommage!) I ran out of my stock and couldn't get to the grocery store for a while, but LUCKILY a frozen vegetable benefactor of mine hooked me up with some of the good stuff today. So more peas!

Now these recipes are a little bit boring, and probably don't really warrant a post of their own, but I just had to share my joy. So here are some ways to make delicious meals out of peas (you may start to see a theme after a while...).

Rice and Peas
Cook some rice. In the last five minutes or so of simmering, add some frozen peas. Alternatively, cook rice and peas separately and mix them together when they're done (this may be better for a rice cooker?). This also works really yummily with frozen corn, but that's not what this post is about.

Peas
Put peas in a bowl. Heat in the microwave (or, if you don't have a microwave *coughElizcough*, steam or boil them according to the directions on the package). Add butter and pepper. You could also add toasted caraway to change things up a bit.

Peas and potatoes
Boil some new potatoes (the little ones with the white or red skins) until cooked. Microwave some peas. Mix peas and potatoes together with a bit of butter (or nut oil? walnut oil would actually be super delicious) and pepper. Add salt, caraway OR raspberry vinaigrette, if you feel so inclined. Add the seasonings when hot and then leave it to soak up the yummy for a little while. This would probably be good hot or cold, so experiment away.

Pasta and peas
Cook some pasta. Also cook some peas. When they're both cooked, mix them together, with a bit of butter and pepper. You could also add some grated cheese (mozzarella, sharp cheddar or blue cheese would all work really well) and/or a little bit of cream. Or, once peas and pasta are cooked, you could saute them with a bit of minced ginger or ginger paste and some lemon juice (and maybe some lemongrass if you had some?). Actually, if you go that route, some pepper flakes or Asian chili sauce wouldn't go amiss, I think.

So there you have it. Peas are a delicious addition to everything and are super-duper versatile. And every day that ends with peas is going to be a good night. (Get it?! the Black-Eyed PEAS!!!)


Thursday, January 14, 2010

SPELT CRACKERS

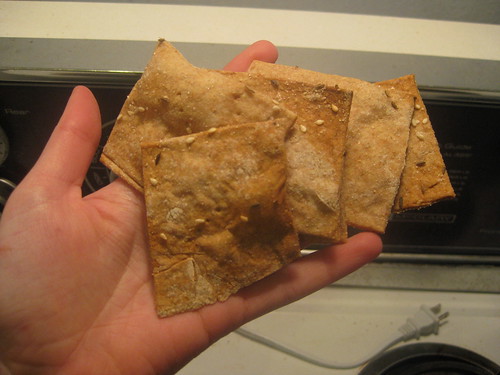
I bought a bag of spelt flour about a month ago, fueling an ongoing obsession with different flours and grains. Today I used the last 1.5 cups on these crackers, which I've made on four different occasions already. That is approximately 100 crackers. And no, I have not shared one. They are that good.

crack

I never thought about making my own crackers until a few months ago, when I paid some exorbitant price for a box of stone-ground whole wheat crackers from Austria. I checked out the side of the box to find the only real ingredients were flour and salt (I mean really? Did we need to go all the way to Austria for that innovation?). After finding this recipe online, I just refused to believe it was actually that simple until I tried it. And of course IT WAS. In 15 minutes I removed my crackers from the oven and they were exactly like the Austrian ones I'd bought except better. And cheaper, hey.

Spelt flour gives the crackers a slightly nutty / more pronounced whole-grain flavor. I haven't tried substituting other types of flour ... YET. But spelt works incredibly well so I might never venture away from it. You can top the crackers with whatever you want--caraway seeds, poppy seeds, sesame seeds, salt, parmesan, herbs, whatever.
Recipe: spelt crackers
1.5 cups spelt flour
0.5 cups water
0.25 tsp salt
toppings (seeds, salt, herbs...) to taste
  • Mix the salt and water in a small bowl.
  • Combine the flour and water and mix until a dough is formed. Turn the dough into a loose ball and place on a well-floured baking sheet. Use the biggest baking sheet you have, and it needs to be absolutely flat. If you don't have a baking sheet without edges, just flip an edged baking sheet over and use the bottom.
  • Roll the dough out so that it covers the entire baking sheet. Try to maintain uniform thickness of the dough, otherwise the thinner bits might burn.
  • Use a fork to poke holes all over the dough. This prevents it from forming air pockets and getting all wonky.
  • Spray the dough with a water bottle and sprinkle with salt, caraway seeds or alternative toppings. For nicely shaped crackers, use a (flat) knife to score the dough into a grid pattern, or triangles, or whatever.
  • Bake for about 15 minutes at 350 degrees F. The crackers should snap apart easily but please don't burn them!
The best thing about these crackers is that I know exactly what goes into them. They are entirely free of mysterious chemicals and oils. And I can add as many caraway seeds as I want (FINALLY!)
I've eaten these with hummus, tofu spread, artichoke dip, whatever (recipes later?). They are extremely versatile.