Wednesday, September 23, 2009

Walnut-fig soda bread


Heavenly?

So admittedly I had nothing to do with this recipe. I happened to have walnuts, figs and buttermilk lying around in excess, so I found this recipe and followed the directions down to the last teaspoon. I wasn't expecting much. But then, this beautiful loaf manifested itself perfectly in my oven. It turned out so perfectly that I needed to share it with you.

Next time I might experiment with some other nuts or dried fruits, and maybe add flax seeds or other grains. Oh man, the possibilities are endless. I am so excited.

Here is the recipe, from Canadian Living. A few tips not mentioned in the article: (1) Be sure not to over-mix the dough. (2) After it's finished baking, don't cut into the loaf until it is totally cooled off!

Good bye, and good luck.

Friday, September 18, 2009

Mug Cake Update

So eggs are not one of the things that I usually have hanging around the house. Milk, yes. Butter, yes. Onions, potatoes, flour, sugar, yes, yes, yes, yes. But eggs, no. So when I had a late-night (ok 7:30 in the evening, but I didn't feel like going to the stores, ok?) chocolate craving, I had a conundrum. I had all the ingredients for chocolate mug cake, minus the eggs. Well, and the vanilla, but you can't have everything. However! Thanks to my vegan friends, I had heard tell of the mythic "egg substitute". I also knew it was possible, if a bit guess-work-y, to replace eggs with things you can find around the house. Things that aren't eggs. So. I had a potential solution. I did a quick google, and found that you can replace one egg with 1 tsp baking powder and 1 tbsp vinegar (plus some water). "Bingo!" I thought. So, I gave it a shot.

Well, the mug that I was using was a bit smaller than the one I used in Montreal, so I decided to use slightly less of each ingredient (well ok, except for the cocoa. and the sugar), and we don't have measuring utensils or a clean teaspoon, so I had to eyeball it. Anyways, my roommate and I had a brief moment of excitement when the vinegar went in on top of the baking powder and fizzed, then I mixed it all up and we were back down to business. I popped it in the microwave for a safe 2 and a half minutes (I'm not sure how British microwaves compare to Canadian ones, so I didn't want to overdo it) and sat back to watch the show.

All of a sudden it started growing. "Not to worry," thought I, "this is to be expected." But then I noticed that the part that was growing (rapidly) above the rim of the cup looked significantly more liquid than it should. As I watched, it started spilling over the side of the cup, and with the speed and agility of a panther on meth I popped open the microwave, grabbed the mug and rushed over to the dishes drawer (yes, drawer) where I carefully held it over a plate until it stopped spilling over. My roommate Naomi was there to catch the single wayward drip. So, as the batter was still, well, batter, I put the mug on the plate and put it back in the microwave.

Naomi and I spent the remaining two minutes and seven seconds watching the contents of the mug bubble and froth, spilling over the edges of the mug and on to the plate. When the microwave dinged and we opened the door, this is what greeted us:

Mug cake, mark II

Well, the moral of the story is this: if you're going to attempt to make this at home without eggs, go easy on the baking powder and vinegar (I used white, btw). In addition to the aesthetic problems associated with this particular experiment, there was a distinct taste of, well, baking powder and vinegar. There are probably a variety of factors that contributed to this: the lack of appropriate measuring utensils, my perhaps too enthusiastic use of this particular egg substitute recipe, the lack of vanilla... I could go on. The cake was definitely edible, but not as delicious as I have had it, which was disappointing.

Anyways, good luck in your egg-substituting endeavors. And learn from my mistakes!

Wednesday, September 9, 2009

Potatich?

So, you're all wondering, where has Zoe been for the last month and a half? Well I will tell you. I've been here:
France
And here:
Saussignac
Here:
Bath

And also all of these places:
Gageac-Rouillac Castle

Sarlat

Sarlat-la-Caneda

Sarlat

Bath

And now here I am finally settled in London. I'm going to put my obvious hat on here and tell you that things are very different in London than the way they are in Montreal, or even Toronto. They drive on the wrong side of the road, which means I nearly get killed every time I try and jaywalk because I look the wrong way (speaking of which, jaywalking isn't illegal here?). Lining up (queuing) is a way of life. And just about all vegetables in supermarkets come pre-packaged. Which means that if you are a poor student cooking for yourself, you end up with way more food than you need because it's impossible to buy one or two handfuls of spinach, say, or fewer than 3 zucchini (courgettes). Also, I basically have to speak a different language (hence the translations in brackets), even more so than in Montreal, which is pretty ironic. Almost as ironic as raaaaaiiiiiiiiiiin on your wedding day.

So, what I'm trying to tell you is that the other day found myself (or rather my fridge) with 2 onions, 3 potatoes, 2 tomatoes and 1 bag of spinach all about to go off at the same time because they were all (necessarily) bought at the same time. Well the potatoes and onions weren't about to go off, but I still had them in the cupboard. Also maybe I like to exaggerate a lot.

Also, I had invested a good 10 pounds (my Canadian keyboard doesn't have the pound currency sign and I have been too lazy to look online for the keyboard shortcut for it) in kitting out my spice box (actually a cereal box with one big side artistically cut out of it). So, being in England, the land of the curry (or something), I decided to attempt a saag aloo, or spinach and potato curry.

So here it is.

Saag Aloo A La Zoe

Ingredients:
About half a teaspoon each of: coriander seeds, cumin seeds (or a little more than a half tsp of these), kalonji (black onion seeds), black mustard seeds (or a little more). You can find all these at your local Indian grocery store, but check your regular grocery store jic. (That's just in case).
About a quarter tsp of fenugreek (semi-optional, I usually get away without fenugreek, but it does add a really nice flavour, and it was one of the ones i bought). Side note: fenugreek is one of the things in my life that I'm both inexplicably drawn to and repelled by. The way it looks is both appealing and a little revolting to me. The cerebellum is another such thing.
A few shakes of turmeric
Some of those red pepper/chili flakes, or something else to make it hot (chili powder, chopped red hot chili peppers, etc.). My hand slipped when I was pouring them in and I ended up with a lot more than I thought I wanted (maybe a tablespoon and a half? maybe 2?), but it ended up being really nice.
1 onion, chopped into medium-sized pieces
3-4 cloves garlic, minced (or garlic paste)
2 medium potatoes (the waxy kind? I don't know, the ones I used were the kind with the nice soft skin, not the kind with the really dirty skin), chopped into about 1cm cubes
2 medium tomatoes, chopped about the same size as the potatoes. (I just used regular plain old, not fancy plum or anything, but you can use what you like. You could also use canned tomatoes, or, in a real pinch, tomato paste+water. Or just leave them out I guess, but they're really nice. You know what? Just go out and buy some tomatoes, they're good and good for you.)
Most of a bag of spinach, or as much as you want to put in? I don't know how big the bag was, and I've already thrown it out. Sorry.
  • So. Get out a big pot with a lid. It doesn't actually have to be too big (you're not making 15 gallons of soup), just big enough. As Elizabeth will tell you, I'm terrible at guessing the right size pot for whatever I'm making and, as usual, I chose too small for this one. Oh well, that's why God invented lids, so you can just squish everything down to fit.
  • Put your whole spices (that's everything from coriander to fenugreek) in the pan (with no oil) and put the lid on. Heat on a med-high heat until things start to turn brown and smell really nice and spicy. Actually, scratch that, you won't be able to tell the colour or the smell very well because the lid will be on. Heat on a med-high heat until the mustard seeds start popping (you'll be able to hear it). Remove from heat immediately and (leaving the lid on) set aside until the popping stops. Empty them into your pestle and mortar/spice grinder/deep and narrow bowl with a strong spoon and grind to a sort of powdery consistency (or as close as you can get to powder with a bowl and spoon like I was using without driving yourself crazy). No biggie if there are a few whole seeds still, or even if you can't be bothered to grind them, but it really does make it nicer!
    • Side note on spices: it's really best to buy whole spices and toast them and grind them as you need them. If you can't be bothered though, by all means by pre-ground spices, they just don't last as long or taste as fresh. But they do have a time and a place! For reference, you don't usually need to grind mustard seeds, kalonji or a few other spices, but it's easier to do all the spices at once. Coriander I would grind if possible, along with cumin. Fennel too, although not every time. Fenugreek you could probably go either way with.
  • Put some vegetable (not olive) oil or butter in the bottom of the (now empty) pan. It should be enough to cover the bottom, plus a tiny little bit extra. Fry the onions on low or medium low (it will depend on your stove) until they're translucent and beginning to get a bit of colour.
  • If you like the way garlic tastes (nice and spicy!) when it's almost raw, add it after the potatoes. Otherwise, add it now.
  • Add the potato chunks. Stir every so often until they're almost cooked. With mine, they kept sticking to the bottom and making like a crust on the bottom of the pan that was threatening to burn and ruin the whole thing so I took a couple of extra steps: I scraped as much as I could off the bottom with the big spoon, I added a bit more butter and then scraped again and finally I added the tomatoes too early. You could "deglaze" (the technical term!) with a little bit of lemon juice (which I didn't have), but I figured that tomatoes are pretty acidic (right?) so I just used them. Damn! I guess I could just have used the tomato juice and saved the tomato chunks for the right time! Oh well, it wasn't ruined. The important thing, though, is to add whatever you're using to deglaze then scrape like crazy to get all the stuff off the bottom.
  • Add the turmeric and chili flakes.
  • Add the tomatoes and stir it up to get all the stuff off the bottom.
  • Add the spinach on top of everything (don't attempt to stir unless you're certain you can do it without flinging spinach everywhere. I learned that the hard way.) Instead, turn the heat down as far as it will go (or even turn it off) and just push the lid down to steam the spinach on top of the potatoes and tomatoes.
  • Keep an eye on it, and when the spinach has wilted enough, give it a good stir and get it all mixed up more or less evenly (can be harder than it sounds).
  • Taste it and see if anything needs adjusting. I added a bit of salt to mine, but you might think it needs a bit more heat (chili flakes or black pepper) or more cumin (this is the time and place for that pre-ground cumin!)
  • Serve with rice or your choice of Indian breads.

Yum!

What's that? Why yes, yes that is my very own GAS STOVE. You say you'd like a better picture of it? Of course!

That's right

Thursday, September 3, 2009

Russian Tomatucumber Salad

This salad saved my life.


Or rather, it was a huge part of my diet for an entire month in Russia. Late July is (seemingly) the peak of the tomatucumber season in Russia (er, the tomato and cucumber seasons), so they were everywhere. Many people I stayed with grew their own cucumbers and tomatoes, along with green onions and dill.

And so this salad was born. I encountered it on several different occasions, in different locations. Everyone seems to make the same salad, and rightfully so. It is so delicious and simple that I'm still making it here in Montreal. I should note that before this trip I did not like cucumbers, tomatoes or dill.

Consider my mind blown.

Recipe: Delicious Salad of Russia

1-2 small cucumbers, or half of one English cucumber, sliced
2-3 tomatoes, cut into manageable pieces
1-2 green onions, sliced up
a small bunch of dill
olive oil
salt (to taste)

Combine everything into a bowl. Don't add too much olive oil--you don't want the tomatucumberes swimming in it. Just drizzle a bit over the top.

EAT AND ENJOY.

Thursday, July 9, 2009

Strawberry, Fool!

Probably the dish that epitomizes summer, to me, is a fool. No, I don't mean that kind of fool. Or even that kind. I mean something that just screams "summer", and that's perfect for anyone, anytime, anywhere. It's decadent, sweet, and basically the most wonderful thing ever invented.

Before you ask, I have no idea why it's called a fool. Until very recently, and due mostly to my sub-par, cereal-box/core French (all you Canadians know what I'm talkin' 'bout), I was convinced it was "foule", i.e. "crowd", maybe because of the "crowd" of fruit in it? Well, now that I now the real name, I have more questions than answers, but don't worry, that doesn't detract from my enjoyment of it.

FOOL

So. Now that you're salivating (I hope), I'm going to make you promise me something before I give you the secret recipe. You must never ever ever under ANY circumstances make this in winter, with those horrible "berries" that cost $6/100g and taste like sawdust. You can ONLY make this when berries are in season in your area, and you have to buy them as local as possible. Ideally from your very own back yard, picked right before you make this. Because really, summer is all about freshness and the beauty of growing things, and fruit that travelled thousands of kilometers to get to your grocery store and doesn't really bear any resemblance to berries fresh off the bush is kind of anathema to that.

Fools can be made with pretty much any kind of soft fruit, like rhubarb, plums, gooseberries, currants, strawberries, raspberries, blackberries... You can also mix and match to suit availability. I prefer fresh berries, either solo or in combination, but I won't say no to fool in any guise. This recipe is for strawberry fool, but it's pretty much the same no matter what kind of fruit you choose. I should quickly note, though, that if you're not using berries or something else really soft and juicy (like extra-ripe peaches or plums), it might be worth it to cut the fruit up bite-size and simmer it with sugar and just a little bit of water. This will soften the fruit and get the juices going, and is especially important with rhubarb. (You should use a lot of sugar with rhubarb.)

I should note, however, that wherever your berries come from, they should be room temperature, to maximize flavour. The cream, on the other hand, should be really cold (not frozen), because it will whip a lot better. SO. The recipe:

Strawberry Fool
Ingredients:
Ripe strawberries (it doesn't really matter how many, as long as the amount of cream you whip can contain them), with a few reserved
Whipped cream* (an amount corresponding to how many strawberries you have)
Sugar, to taste
  • In a medium-sized bowl, mash the strawberries with a fork. You want them kind of chunky, but so that you really have whole strawberry pieces. But I guess it's kind of a matter of personal taste...
  • Drain as much of the juice as possible into another dish. You can always add it back in if you want, but it tends to make everything watery and slightly less than perfect.
  • Add the whipped cream to the bowl and GENTLY fold until combined. If you're too rough with it, the cream will either collapse or (if you're really rough) turn to strawberry butter (which is a post for another day).
  • Give it a taste, and if you think it needs more sugar, add it now, then mix it in (gently)
  • Drink the strawberry juice, because it is just too delicious to waste, and if you do it now, then no one will know they didn't get any.
  • Dish it out and put a couple of the reserved strawberries on top of each helping.
  • DON'T EAT IT ALL YOURSELF! Even though you want to. It's soooo much better when you share it with friends.
*Whipped cream. I know some of you think it comes out of a can. Well I would just like to tell you right now that the stuff in the can is "edible oil product", meaning it has no idea what a cow even looks like, much less spent part of its existence in one. Besides, whipping cream is probably one of the easiest, chefiest things you can do. The only hard part is knowing when to stop. So I'm going to tell you how to do it, old school: no edible oil products involved.
Ingredients:
Whipping cream (also called double cream, 36% m.f.), really cold
Sugar (optional)
Vanilla extract (optional)
  • Put the cream into a bowl (pre-chilled, if you like)
  • Using a whisk, two forks, an electric mixer (with whisk attachments) or a stand mixer (ditto), whip the cream. It will get frothy, then gradually stiffen until it will stand up in peaks if you take the whisk out (turn the mixer off first!).
  • STOP. Immediately. Do not pass GO, do not collect $200. If you whip it too much, it will turn into butter, and this happens very quickly and with very little warning. It's better to have cream that is slightly less stiff than to have butter.
  • It is delicious as is, but if you like you can add a bit of sugar and/or a few drops of vanilla extract. Mix it in with the whisk.
So there you go, two recipes for the price of one. And, for a limited time only, I will throw in a free TIP: if you happen to splash/drop strawberry (or any other fruit juice) on your clothes, immediately remove the affected item and pour hot (preferably boiling) water on to it from a height. This is probably best done in a sink or bathtub (not over your little brother), and be careful not to splash yourself. The stain should come out before your very eyes.

MMMMMMMM

Sunday, June 14, 2009

PAIN AUX BANANES

I've baked a lot of banana bread in my time.

I've been around the block. I know what's up. I've tried banana bread with cake flour, with whole wheat flour, with nuts, with raisins, with rolled oats, with white sugar, with brown sugar, with dulce de leche, with pecans, etc. I've seen it all.

So I think it's about time I shared my knowledge with you.


The recipe I will share is adapted from my grandmother's recipe. I can remember one night last year when I desperately called home searching for it, and had my dad read the steps out to me so I could copy them down. I make this bread all the time, and my copy of the recipe is now stained with batter spots and the ink is bleeding off the page.

I've changed a few things over the months (more nuts, less sugar...), but the general ideas remain the same.

Recipe: Banana Bread
Ingredients:
3 ripe bananas (the skin should have lots of brown specks)
1/3 cup applesauce
1/2 cup brown sugar
1 egg, beaten
1 teaspoon vanilla
1 teaspoon baking soda
1 pinch salt
1.5 cups flour (I used half whole-wheat and half all-purpose)
1/2 cup chopped nuts (walnuts and pecans work well)
  • Prepare your loaf pan. Either butter the pan and dust it with flour, or line it with parchment paper. Preheat oven to 350°.
  • In a large bowl, mix applesauce into mashed bananas.
  • Add sugar, egg and vanilla.
  • Sprinkle baking soda and salt over the mixture, then incorporate the flour and nuts. Be sure to work quickly! If you mix it up too much or stall, the bread won't cook properly.
  • Immediately transfer the mixture into your pan and bake for 45 to 60 minutes, or until the bread is a nice, dark brown color.
  • Let it cool for at least 15 minutes. This is important. The bread is still cooking even though it's out of the oven, and if you cut into it right away it might not ever finish. Ever.
  • Eat and enjoy along with a glass of milk.
Variations: You could add 1/2 cup of rum raisins to the mix, if you're into that. Or blueberries, or chopped apples. Zoe claims chocolate chips also work well, but I don't know if I buy it.


* * * Update: I have modified the recipe once again! Testing has proven applesauce an adequate substitute for butter in this recipe.

Monday, June 1, 2009

Peach-Blackberry Procrastination Pie

I have a habit of baking things to divert myself from studying. This time it's for my summer course on the theory of Probability, which is actually just Calculus and Statistics in a clever disguise. But wait, isn't everything?

I've noted before that I take significant cooking inspiration from what is on special at my local grocery store(s). Yesterday I was quickly drawn in by the blackberries and peaches, which happen to be two of the most delicious fruits ever. Obviously I snatched up as many as I could carry in my book bag and even returned today for more. I ended up with, like, seven boxes of blackberries and two large bags of peaches.

You couldn't expect me to sit around studying with all these fresh fruits lying around, could you? Oh, the temptation.

So I baked a pie. You know, for some study energy.


Last week, I found a used copy of The Joy of Cooking, which has been incredibly helpful. The great thing about this book is its basic explanations of various fruits, breads, grains, etc. I've already used it to figure out how to eat figs, and classify different types of pasta. The illustrations are probably my favorite part. Now I know exactly how to clean a squid, or make a sectioned brioche loaf. And chances are, if I buy some random vegetable and don't know what to do with it, Joy can tell me. She also has an extensive section on pie-baking.

So first off... I'll talk about the pastry.

Before this week, I had been using Martha Stewart's recipe, which turns out to be exactly the same as Joy's recipe. I pretty much always use butter as the source of fat needed for the pastry, but Zoe has told me she uses lard. We might include further discussion on this in a later post. Joy claims you can also use shortening, but... ew.

Recipe: Flaky pastry crust
Ingredients:
2.5 cups flour (I used 1.5 cups unbleached all-purpose and 1 cup whole wheat)
1 teaspoon sugar
1 teaspoon salt
1 cup cold butter (or your preferred source of fat)
.25 to .5 cups ice water
  • Mix the flour, sugar and salt in a large bowl. Cut the butter into small cubes and mix it up with the flour so that it's all evenly distributed.
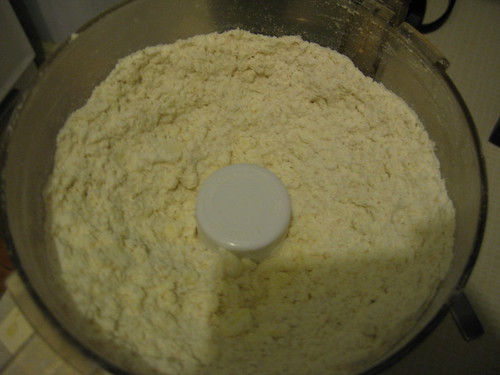
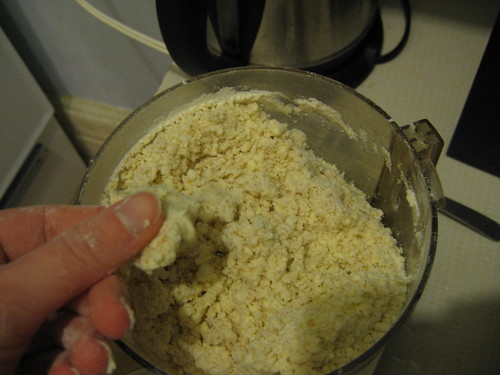
  • Process the flour-butter in a food processor until it resembles "coarse meal". This means it should look like tiny pebbles in sand. The mixture should feel powdery and not greasy. (You can split it up into two batches if you have a small food processor like I have.)
  • With the processor running, slowly pour in the water. Don't add too much--you want the mixture to just barely stick together. Try pinching a little bit between your fingers. If it's still crumbly, add a little bit more water. Be careful not to process it too much. We want to keep the butter in small pebbles.
  • Press all the dough together so it coheres. Then split it up into two discs, kind of like big hockey pucks (lol Canada). Wrap each disc with plastic wrap and refrigerate at least 30 minutes before using. You can also store these in your freezer for up to 6 months, apparently.
Rolling out the dough should be pretty self-explanatory. You just need a rolling-pin, some counter space and extra flour. Lightly flour your surface and rolling-pin. Place the dough-puck on the surface, and roll it from the center out to all directions. You want to try and keep it shaped as a circle, but if it assumes a weird shape you can fix it. Just cut off the protruding pieces and move them to where they need to be. Overlap the edges of the two pieces of dough and roll them back together. Roll the dough out 3-4 inches larger than it needs to be for your pan, and be sure to seal up any cracks before placing it.

I lined my pie pan with parchment paper, only because previous endeavors have exposed it as non non-stick. Greasing the pan with butter should also work--I was just being overly precautious.

You will probably want to make the pie filling while your pie crust is in the fridge, because it takes some time. Please note that you can use the pastry recipe above for lots of different pies! It will work for any sort of fruit pie, pecan pie... whatever.

Recipe: Peach-blackberry filling
Ingredients:
2 cups blackberries (raspberries would also work well)
3 cups peaches (this was about 6 peaches for me, I think.)
0.75 cups sugar
3.5 tablespoons corn starch
1 tablespoon fresh lemon juice
1/8 teaspoon salt
2-3 tablespoons butter, cut into small cubes
  • Peel the peaches and chop them up into small pieces (about 1 cm).
  • Combine the chopped peaches, blackberries and other ingredients (but not the butter yet!!) into a large bowl. Let the mixture sit for 15 minutes, stirring every once and a while.
The point of adding the corn starch is to thicken the filling so that you can actually cut into the pie and eat it with a fork, rather than dumping the whole juicy thing into a bowl and eating it with a spoon (still tasty).

For pie assembly!!!!!!!!!!!!!!
  • Preheat your oven to 400° F.
  • Roll out the first disc of dough and fit it into your (possibly lined) pie dish. Leave that extra dough hanging over the edge for now.
  • Spoon the filling into your pastry, and then sprinkle the cubes of butter (from the filling recipe) on top of all that fruity deliciousness.
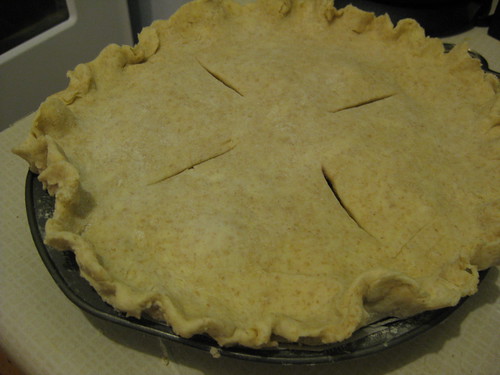
  • Roll out the second disc of dough for the top crust. Brush the overhanging dough of the bottom crust with water or egg, then fit the top crust on. Press the edges together to seal the whole thing up. You can then fashion this crust into various edge designs. Trim any spots that have a huge excess of dough.
  • Brush the top crust with egg or milk, and sprinkle some sugar on it. Cut vents into the top of the crust and pop it in the oven.
  • Bake for 30 minutes at 400 degrees, and then turn the temperature down to 350 and bake for another 25-35 minutes, or until thick juices bubble through the vents. You might want to put a baking sheet on the oven rack below your pie to keep things clean.
  • Try to let the pie cool completely before digging in.

Mmmmm.