Saturday, January 30, 2010

Corn bread and some failures

So I had this idea (like a lot of other people) to bake through the Bread Baker's Apprentice. I got a copy for Christmas (along with some other excellent cook books). It's probably clear I'm really, really into bread, so of course I am taking this challenge very seriously.

cornbread

In general I bake a loaf of bread each weekend. Last weekend I began my challenge with Anadama bread, which is a (deceivingly) simple sandwich loaf defined by its inclusion of cornmeal and molasses. Unfortunately mine was a bit of a flop. There were a few issues, ultimately causing it to be too tough and a little bland.

One: Peter Reinhart urges me to use instant yeast rather than active dry yeast. I really dig active dry yeast, but I thought I'd give instant a chance. Instant yeast comes in smaller granules and can be mixed directly into the dry ingredients. You use less of it than you would active dry, and it takes a bit longer to fully activate. The longer activation time, combined with the low temperature of my apartment caused the dough to rise extremely slowly. So slowly (four hours) that I figured it had finished rising. It hadn't!

Two: I paused my cooking to go ice skating and refrigerated the dough after the first rise. When I removed my dough from the fridge, it had formed this dry, crusty shell on the outside. I sprayed it with water and cut a slit in the top, but it was still pretty stiff. This might have prevented the loaf from fully expanding.

SO. This weekend (yesterday), I set out to learn from my mistakes and master Artos bread (Greek celebration bread). The recipe required that I make a starter dough with flour, yeast and water. I was supposed to let it sit for 3-4 hours until foamy and bubbly, then refrigerate overnight. Four hours passed and the mixture looked about the same, so I left it a bit longer. Eventually I forgot about it and went to sleep. This morning I discovered it on my kitchen countertop, gooey and deflated. It had the consistency of glue. Too heartbroken to start again, I decided to skip ahead to the only quick bread in BBA: corn bread.

Here is the recipe on another blog.

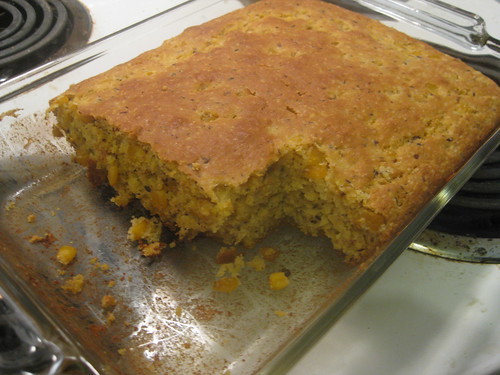
This corn bread gains my approval for its inclusion of corn kernels and honey. In the original recipe, Reinhart loads the bread with crispy bacon strips and greases the pan with bacon fat. This sounded a little revolting to me and so I left the bacon out. I also swapped the buttermilk for soy milk and the eggs for ground flax sees and water. I forgot to change the soymilk into butter-soy-milk, so I just added a little lemon juice to the dough in the end. I don't know if it actually had an effect. Reinhart also suggests that I mix the polenta and buttermilk first and leave them overnight to develop the flavors. I wanted some instant gratification after ruining my Artos starter dough, so I skipped this step and made everything together in a few hours.

It turned out GREAT, by the way. Very moist, hearty, a little sweet, and crispy on top. It's not an everyday corn bread, the type I would drizzle honey onto or dip into a bowl of chili. This is more a standalone cornbread, similar to my mom's corn casserole. I see it suited very well for holiday-style potlucks or alongside some veggies for lunch.

Tuesday, January 19, 2010

More Peas Please

So peas have recently become a staple of my diet. Frozen petit pois, at £1.50 a bag, to be exact. Now I have spent most of my life a pea-hater. The only peas I would eat (other than snow and snap, which don't really count) were fresh off the vine (?) and outta the pod, straight into my mouth. From my very own garden, of course. But then I discovered frozen peas. Now, to be precise, they HAVE to be just peas, none of this mixed vegetable shit. Just pure, unadulterated peas.

So maybe I'm making up for lost time or something (see cheesecake, milk) but I basically have them in everything. Heck, sometimes I even have just a bowlful of peas for dinner. DEEEEEE-LISH. Recently (quelle dommage!) I ran out of my stock and couldn't get to the grocery store for a while, but LUCKILY a frozen vegetable benefactor of mine hooked me up with some of the good stuff today. So more peas!

Now these recipes are a little bit boring, and probably don't really warrant a post of their own, but I just had to share my joy. So here are some ways to make delicious meals out of peas (you may start to see a theme after a while...).

Rice and Peas
Cook some rice. In the last five minutes or so of simmering, add some frozen peas. Alternatively, cook rice and peas separately and mix them together when they're done (this may be better for a rice cooker?). This also works really yummily with frozen corn, but that's not what this post is about.

Peas
Put peas in a bowl. Heat in the microwave (or, if you don't have a microwave *coughElizcough*, steam or boil them according to the directions on the package). Add butter and pepper. You could also add toasted caraway to change things up a bit.

Peas and potatoes
Boil some new potatoes (the little ones with the white or red skins) until cooked. Microwave some peas. Mix peas and potatoes together with a bit of butter (or nut oil? walnut oil would actually be super delicious) and pepper. Add salt, caraway OR raspberry vinaigrette, if you feel so inclined. Add the seasonings when hot and then leave it to soak up the yummy for a little while. This would probably be good hot or cold, so experiment away.

Pasta and peas
Cook some pasta. Also cook some peas. When they're both cooked, mix them together, with a bit of butter and pepper. You could also add some grated cheese (mozzarella, sharp cheddar or blue cheese would all work really well) and/or a little bit of cream. Or, once peas and pasta are cooked, you could saute them with a bit of minced ginger or ginger paste and some lemon juice (and maybe some lemongrass if you had some?). Actually, if you go that route, some pepper flakes or Asian chili sauce wouldn't go amiss, I think.

So there you have it. Peas are a delicious addition to everything and are super-duper versatile. And every day that ends with peas is going to be a good night. (Get it?! the Black-Eyed PEAS!!!)


Thursday, January 14, 2010

SPELT CRACKERS

I bought a bag of spelt flour about a month ago, fueling an ongoing obsession with different flours and grains. Today I used the last 1.5 cups on these crackers, which I've made on four different occasions already. That is approximately 100 crackers. And no, I have not shared one. They are that good.

crack

I never thought about making my own crackers until a few months ago, when I paid some exorbitant price for a box of stone-ground whole wheat crackers from Austria. I checked out the side of the box to find the only real ingredients were flour and salt (I mean really? Did we need to go all the way to Austria for that innovation?). After finding this recipe online, I just refused to believe it was actually that simple until I tried it. And of course IT WAS. In 15 minutes I removed my crackers from the oven and they were exactly like the Austrian ones I'd bought except better. And cheaper, hey.

Spelt flour gives the crackers a slightly nutty / more pronounced whole-grain flavor. I haven't tried substituting other types of flour ... YET. But spelt works incredibly well so I might never venture away from it. You can top the crackers with whatever you want--caraway seeds, poppy seeds, sesame seeds, salt, parmesan, herbs, whatever.
Recipe: spelt crackers
1.5 cups spelt flour
0.5 cups water
0.25 tsp salt
toppings (seeds, salt, herbs...) to taste
  • Mix the salt and water in a small bowl.
  • Combine the flour and water and mix until a dough is formed. Turn the dough into a loose ball and place on a well-floured baking sheet. Use the biggest baking sheet you have, and it needs to be absolutely flat. If you don't have a baking sheet without edges, just flip an edged baking sheet over and use the bottom.
  • Roll the dough out so that it covers the entire baking sheet. Try to maintain uniform thickness of the dough, otherwise the thinner bits might burn.
  • Use a fork to poke holes all over the dough. This prevents it from forming air pockets and getting all wonky.
  • Spray the dough with a water bottle and sprinkle with salt, caraway seeds or alternative toppings. For nicely shaped crackers, use a (flat) knife to score the dough into a grid pattern, or triangles, or whatever.
  • Bake for about 15 minutes at 350 degrees F. The crackers should snap apart easily but please don't burn them!
The best thing about these crackers is that I know exactly what goes into them. They are entirely free of mysterious chemicals and oils. And I can add as many caraway seeds as I want (FINALLY!)
I've eaten these with hummus, tofu spread, artichoke dip, whatever (recipes later?). They are extremely versatile.

Sunday, January 3, 2010

Pecan pralines

On my last day of work before travelling to Texas this winter break, one of my co-workers demanded, "Bring something back for us. Something edible."

I kept this in mind for the duration of the trip, first considering salsa, or maybe pico de gallo, then settling on pralines. My dad was kind enough to pick up a box of praline-like candies, called pecan chewies. And while these treats are delicious and do contain pecans, they are not pralines. So upon arriving in Montreal I decided to make my own.

praline

(Be sure to bookmark this for next year because pralines make an excellent addition to the standard Christmas cookie package.)

Pralines (pronounced PRAY-leens in Texas) are generally found in Mexican food restaurants and dodgy convenience stores, although their origin is French (via Louisiana, where they are pronounced PRAH-leens). I'd say they are comparable to peanut brittle or fudge (in theory). The best pralines have a LOT of pecans and snap apart easily. This recipe worked perfectly, and even though the only change I made was cutting it in half, I will reproduce it here:
Pecan pralines
1 cup brown sugar
1 cup white sugar
3 tablespoons golden syrup
1 tsp vanilla
1/3 cup milk or soymilk
1.5 tsp butter
2 cups pecans
  • Combine all the ingredients in a pot. Heat on medium-high until the mixture comes to a boil, then heat and stir for 5 (or so) minutes. Remove from heat and stir until the mixture looks a bit dull (or just less glossy), about 2-3 minutes.
  • Spoon the pralines onto a lined baking sheet and cool for at least 20 minutes.

Note: Definitely DO NOT eat them all in one sitting. I don't even recommend eating more than one at a time.